SMART Board Tips & Tricks...

This is our new 21st Century learner... wow!
Tip #17
SMART Response- Student Log-In vs. Anonymous: When using SMART Response software, you are hopefully attempting to collect data that will drive your instruction. In order to collect this precious data you will need to have all students log-in using their specific student ID's. This will not work in anonymous mode. This is the most important when giving summative assessments. Your questions will need to be in a set with a title page.
*Try using some questions varying the response type (i.e. yes/no, true/false,...).
Tip #16
SMART Response- WHY? and WHEN?:
When downloading SMART Notebook software you are given the option of including the Response software too. Should you include this option? The answer is yes!
SMART Response software allows you to poll your class instantly and allows you to formatively assess you students.
* It requires some hardware but if you want to use white boards to have students respond that is fine also. Ask those important guiding questions that maximize learning within your lesson. If you are not using the hardware you are able to download lessons from SMART Exchange that include Response content... a great option!
Tip #15
Homework Calendar- Gallery Highlight: Have you gone searching for a calendar
to place on your SMART Board? There are many different calendars to choose from within the Gallery sidetab. Open the Gallery Essentials and there is a folder called Administration and Evaluation, there you will find templates for days, months and weeks.
*Try using the weekly calendar, shown to the right, as your homework organizer for the week. You can make changes and save it as a homework SMART Notebook file.
Tip #14
Modeling Writing the Alphabet- Elementary: Research says that children learn best by modeling. How can we model writing involving the SMART Board? Easy... just search the Gallery for paper and under Backgrounds and Themes there are many different types of writing paper. Change one of your pen's properties to thick, dashed and have it starting with a circle and ending with an
arrow. Now model the correct direction for target letter practice. Now have students visit the board and try it for themselves. This quick tip is designed to help promote student SMART Board interaction.
*Email some of your variations of this activity at mford@nextlevelpd.com.
Tip #13
Scrolling Text Banner- LAT Highlight: In the Lesson Activity Toolkit there are some real "gems" that you may pass by. This is one of them... search your gallery for "scrolling" and you will have only one item under Interactive and Multimedia. The scrolling text banner allows you to type and modify a message
that will scroll across your screen while presenting in Notebook software.
*Perfect to scroll activity directions while students are completeing an assignment. Also, scroll your lesson objective during class, so your students are aware of the purpose of the lesson.
Tip #12 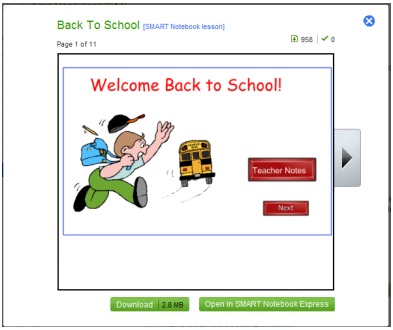
Back to School Notebooks- SMART Exchange Highlight: Looking for a great presentation for the first day of school? Go to the SMART Exchange website where you are able to browse and download many different Back to School lessons. Just preview & download the lesson of your choice and then modify... Easy as 1,2,3!
*Try to look for lessons that also include classroom rules. Why make what is already made!
Tip #11
"Question Flipper"- LAT Highlight: Trying to develop new and improved ways to use formative
assessment during your lessons? In the Lesson Activity Toolkit of SMART Notebook software there is a flash graphic that enables you to present questions to your students during the course of your presentations. The question flipper can contain words and/or images and are different shapes too. The square question flipper to the right is easily customizable and assesses your students immediately. Search the gallery using the keywords question flipper.
*Allow your students to answer questions on the flippers by supplying them with a dry erase board. Formative assessment can enhance your by enabling you to identify who knows what!
Tip #10 - August 18
Erase to Reveal Trick: Do you want to add some magic to your lesson presentation? You can by using the trick of ERASE TO REVEAL... the trick is demonstrated below. Enjoy!
*Prepare before class begins and tell the students that your Magic Eraser has been programmed to make the information magically appear on the screen.
Tip #9 - August 17
Lesson Activity Toolkit Highlight- Page Templates:
Are you trying to add style to your lessons and keep coming up empty? The Lesson Activity Toolkit 2.0 (LAT 2.0) is included in your SMART Notebook software and has over 100 different page templates to choose from. You are able to differentiate your lesson's "look" by using various colors and styles. Take a look in the LAT 2.0 today and make your lesson appear professional immediately.
Tip #8 - August 16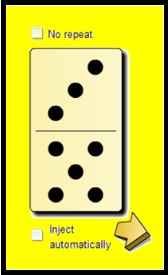
Domino Generator Addition: Have you explored all the items available in the SMART Gallery essentials? More than likely your answer is no because there are 6708 items that are available. There are some great items though, one of which is the Domino Generator. Search the gallery using the keyword domino and then under the interactive multimedia folder there will be a domino generator. It can be used in a variety of ways.
*If you teach grades K through 6, then use the generator as a quick method to practice addition. Select a domino and have the students find the sum of the dots.
Tip #7 - August 15
Drop Shadow Effect: Often times you are able to add effects when working with text. What does SMART Notebook offer when trying to enhance your text? Not much really. So I have a way for you to add a drop shadow effect to your text. Watch the demonstartion below, along with step by step instructions.
*Just try to utilize this for your titles or statements of importance... Will lose it's effect if used too often.
Tip #6 - August 14
Pull Tab Reveal: Have you been looking for a way to present your lesson notes in a more organized way? Try using pull tabs... Below is a demonstration how to add text to a pull tab and "hide" your notes content out of sight up top or to the right or left sides. You will need to search for pull tab in the gallery search bar and choose one of the many that are already included in your SMART NOTEBOOK software.
*Using pull tabs to organize your lesson notes is a wonderful way to demonstrate to your students how to organize their own notes!
Tip #5 - August 13
Floating Toolbar Highlighters / Language Arts TIP: How do Language Arts teachers use SMART tools outside of Notebook software? The floating toolbar often gets in the way of your desktop but it can help. You are able to insert two highlighters. By default there is already a yellow highlighter available, but try choosing the customize gear at the bottom of the toolbar and add another yellow highlighter but choose to change highlighter's properties. The green choice next to yellow works great.
*When reviewing a writing passage, use the different color highlighters to mark different parts of speech (i.e. verbs yellow and nouns green)
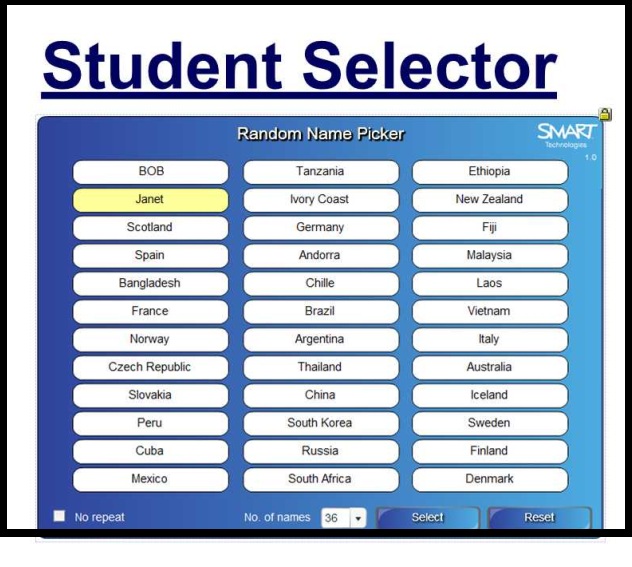
Tip #4 - August 12
Gallery Highlight STUDENT SELECTOR: Looking for a better way to randomly choose students? Search the Gallery for the Random Word Chooser...Instead of using words, use student names.
*When using the student selector, choose the first person and then after they respond correctly then have them select the next student, and so on... Increases student interaction and allows the students to use the board also!
Tip #3 - August 11
Utilizing Attachments Sidetab: Do you work on the go? Are you creating files outside of your classroom? The attachments sidetab allows you to attach copies of all of your files that you will utilize during your lesson. The "flow" of your presentation will improve because you will not be searching for that file you needed on a moments notice!
*Attach your .pdf, .doc files that your students are working off of. Also
include hyperlinks to all of your related websites you plan to use. These attachments are copies of your files not links, so your notebook file will be bigger than normal.
Tip #2 - August 10
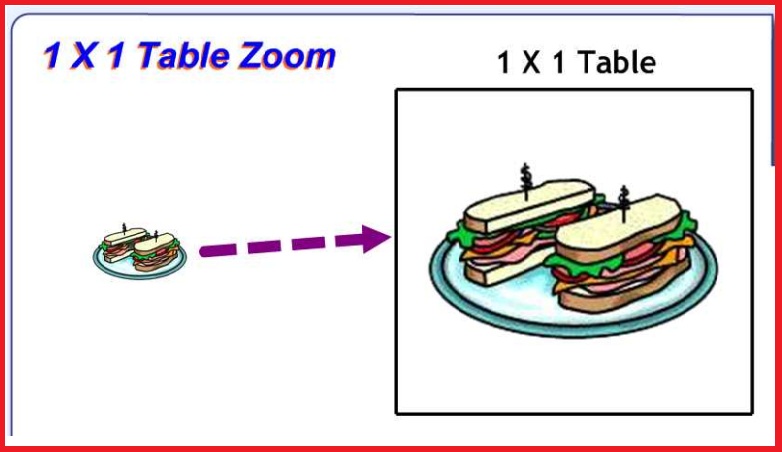
1 X 1 Table Zoom Trick: This simple trick allows you or your students to drag and drop an object into a table cell. The object will automatically enlarge to fit the size of the cell. MAKE THE TABLE A 1 X 1 CELL...
*Shrink objects or problems and have students select objects that THEY WANT to reveal and explore.
Tip #2 is courtesy of Larry from Council Rock...Thanks Larry!
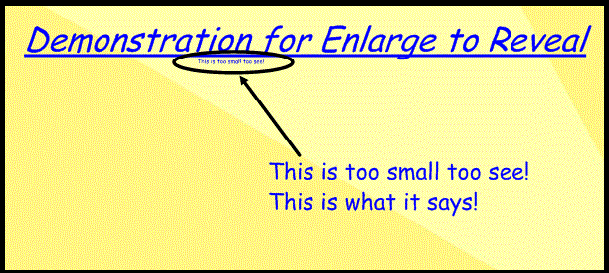
Tip #1 - August 9
Enlarge-to-Reveal: Have you ever found yourself with too much information to fit on one page? Try typing in your highlighted points, then resizing them to a smaller size. This will allow you to hide many of your notes in plain sight!
*Suggest to your students that there are "easter egg" hints hidden and challenge them to come to the SMART Board and reveal them all.